At a definition level, classes are objects defined by the keyword class, followed by an identifier (name) and a body (code block), which contains the codes that define the object and its behavior.
Most of the times, classes can contain only four kind of elements:
- Fields – member variables of a certain type, defined at class level
- Properties – a special kind of programming constructs which helps us manipulate the fields, and set the properties of the object
- Methods – they implement the functionality of the object.
- Events – they signal when certain actions have been performed.
These new concepts are not very descriptive now, but lets assume the real world objects comparison, which will help us better conceptualize them. Lets take for instance a random object, like a microwave oven. In real world, we could say that an oven has some properties, like color, dimensions, weight, right? And we can also say that we can perform certain actions on it, like turning it on, off, setting the temperature, etc. Finally, we can say that our oven has events such as the “ding!” sound when the cooking action is complete.
Well, there it is! That’s a programming object! A programming object can have properties – dimensions, color, weight, can have methods – like turning on or off, and can have events – like making a “ding!” sound when an action is complete! See? Its really not at all different from the real world!
Now that we somehow start to see the general concept of it, lets roll up our sleeves and practically code our oven programming object. First of all, since its the first time we are dealing with classes, lets see how we can add one to our project.
In the Solution Explorer window, right click on your project name (the project, not the solution!), and chose from the menu “Add” the submenu “Class…”, like in the following image:
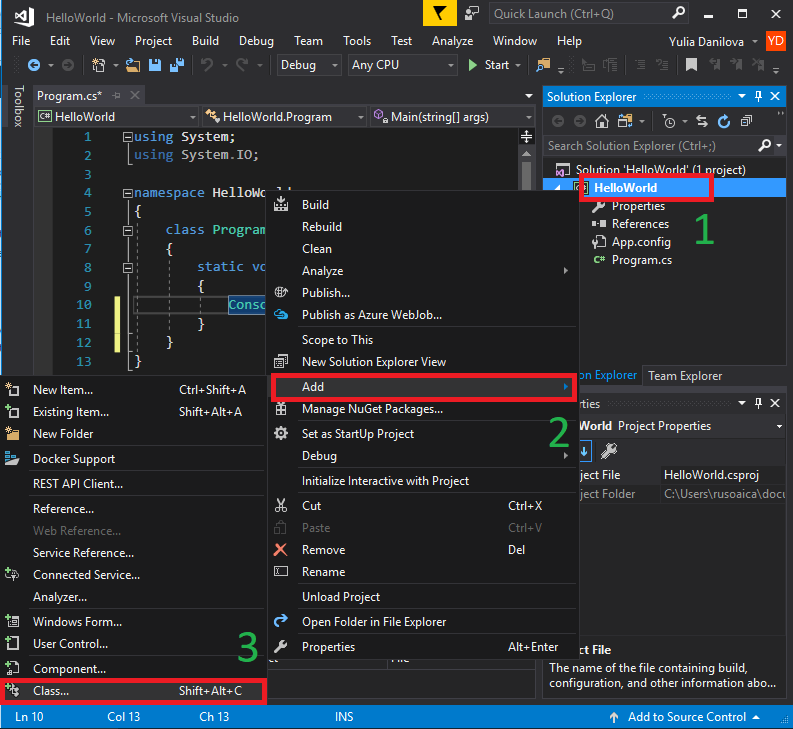
You can alternatively go to the Project menu and chose “Add Class…” directly. Once done, a new window will appear:
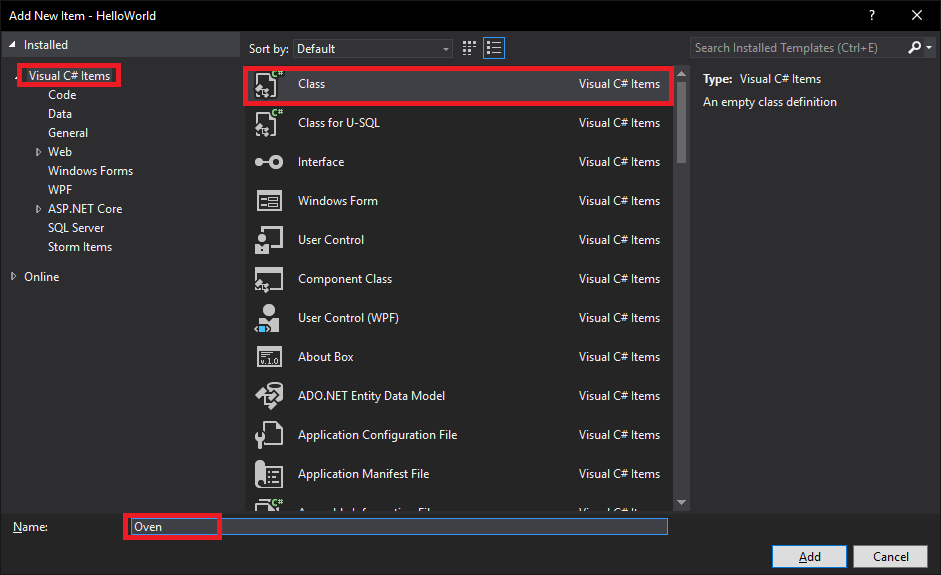
Make sure you have selected “Visual C# Items” on the left list, and “Class” template selected in the list. Name your new class “Oven”. Click Add button. You should now have a new file that looks like this:
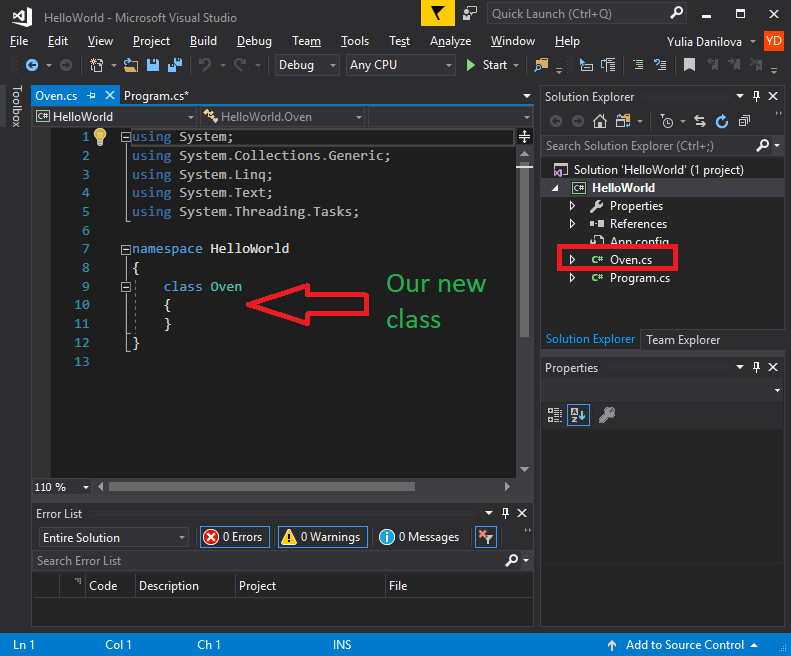
You can see your newly created file on your project on the right, and you can also see its codes in the main window.
And that was it. We have created a new object named Oven, which, for the moment, is empty, but it exists. As I explained earlier, you can see that it is defined by the keyword class, followed by an identifier (“Oven”), and a body (the space delimited by the curly brackets). We can now start designing and altering it the way we want. So, lets add some code to it:
class Oven
{
    private string model; // Field "model"
    private string color;
    private int weight;
    private int height;
    private int width;
    private int length;

    public string Model // Property "Model"
    {
        get // Getter of the property "Model"
        {
            return this.model;
        }
        set // Setter of the property "Model"
        {
            this.model = value;
        }
    }

    public string Color
    {
        get { return this.color; }
        set { this.color = value; }
    }

    public int Weight
    {
        get { return this.weight; }
        set { this.weight = value; }
    }

    public int Height
    {
        get { return this.height; }
        set { this.height = value; }
    }

    public int Width
    {
        get { return this.width; }
        set { this.width = value; }
    }

    public int Length
    {
        get { return this.length; }
        set { this.length = value; }
    }

    public Oven() // Default constructor
    {
        this.model = "EKK6450AOX";
        this.color = "Gray";
        this.weight = 40;
        this.height = 85;
        this.width = 60;
        this.length = 60;
    }

    public void TurnOn() // Method TurnOn
    {
        Console.WriteLine("Oven turned ON!");
    }

    public void TurnOff()
    {
        Console.WriteLine("Oven turned OFF!");
    }
}
This may seem like a lot of code, but if you look carefully, it is very repetitive. Anyway, we have reached our goal, we have created a virtual object of type oven, which has fields, properties and methods. It does not have events yet, because events are a more complicated concept, which we will learn in the future. In the next lessons, I will explain each of these components of an object in greater detail.
Tags: class, object oriented programming, objects

