XAML (Extensible Application Markup Language) is the language behind the visual presentation of an application that you develop in Microsoft Expression Blend, just as HTML is the language behind the visual presentation of a Web page. Though it is not this website’s purpose to teach XAML, and though programmers can develop a program’s interface almost entirely without knowing XAML, in this lesson I will talk briefly about what XAML is, what does it look like, what it does and how we can use it.
So, what is XAML? The short definition is that XAML is a simple XML based declarative language in the sense that it defines the WHAT and HOW you want to do. The main advantage of XAML is the separation of how the program looks and how it behaves. The main disadvantage of WinForms was that the functional code and the visual interface were both created in C# or VB.NET by the programmer, and they were not interchangeable. In addition, it required more effort from the programmer, to create both the GUI and the functionality, which many coders loathed, since they were not designers.
With the arrival of XAML, this problem was finally solved. XAML was decoupling the visual interface from the code behind, making them two separate processes. This meant that a qualified designer could design the GUI in the same time a coder was developing the functionality, and that the two components would interact with each other. Another beneficial consequence of this was that different GUI’s could be created for the same functional code.
As a schematic, it looks like this:

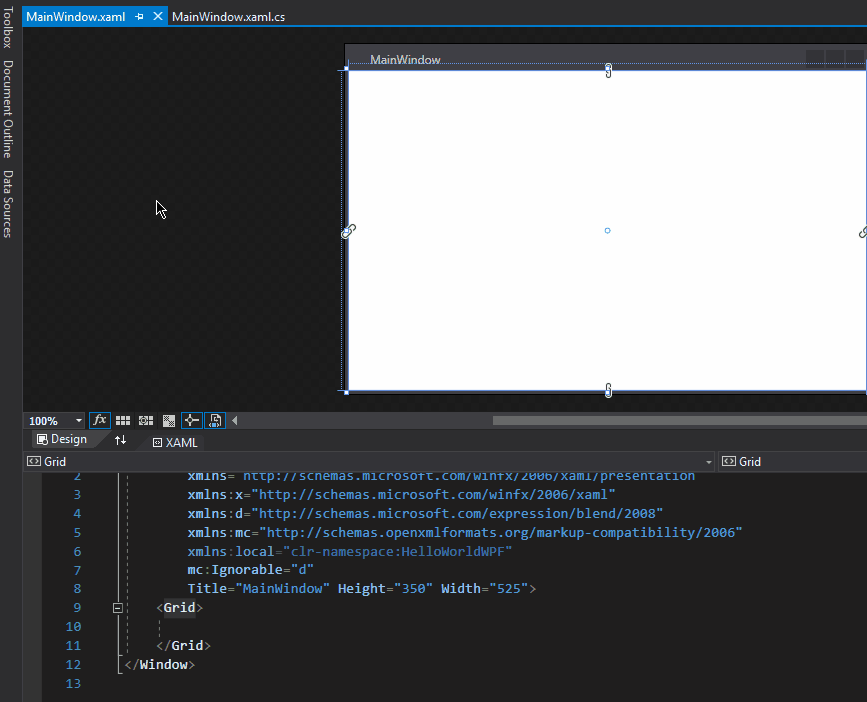
In the previous lesson, I was explaining that the file MainWindow.xaml is displayed as a set of three main panels, one showing the visual representation of our GUI, the second displaying the XAML representation of the same visual interface, and the third panel indicating any errors we might develop in the process of creating our interface.
If you take a look in the second panel, you will notice some codes similar to these:
<Window x:Class="HelloWorld.MainWindow"
        xmlns="http://schemas.microsoft.com/winfx/2006/xaml/presentation"
        xmlns:x="http://schemas.microsoft.com/winfx/2006/xaml"
        xmlns:d="http://schemas.microsoft.com/expression/blend/2008"
        xmlns:mc="http://schemas.openxmlformats.org/markup-compatibility/2006"
        xmlns:local="clr-namespace:BunaLumeWPF"
        mc:Ignorable="d"
        Title="HelloWorld" Height="350" Width="525">
    <Grid>

    </Grid>
</Window>
I know the above codes don’t tell you much, and it is understandable. For the most part, you, as programmers, won’t even have to understand them. Though, even if you have no idea about XML at all, you should recognize a pattern that is similar to our C# codes: there are structures with a beginning and an end, containing a body, and they are easily identified by indentation. You can clearly see that we have a Window object enclosed between <Window>…</Window> and that this object contains another object called Grid, also delimited by a header and an ending: <Grid>…</Grid>. For those who have coquetted with web design before, this even looks very similar to some strange HTML.
XAML works on a parent–child structure basis. There are parent objects – in our case Window, which contain child elements, like our Grid. By default, a grid is set as the first element after page. By clicking on various elements in XAML, you will notice changes in the visual design panel, indicating the current selected visual object:

Since we now know that the Grid is an object that can contain other objects, lets add a child to it, namely a button, since this is the most familiar control in every interface. As I said in the previous lessons, there are more than one ways in which we can add controls to our GUI. The first one is by Drag and Drop. On the left side of Visual Studio, click on Toolbox, then click and hold over Button, then drag that Button over the surface of our window, and release it, like this:
You will notice three things: our visual design window now contains a Button control, the XAML codes have been slightly modified (a new line was inserted as a child of the Grid), and the selection inside the XAML editor has been changed to indicate that the newly created button is the selected element.
That’s it! You have finished adding a control to the GUI of your program! That’s why I was saying in a previous lesson that it is not mandatory to learn XAML, since we can at the very worst design our GUIs entirely by drag and drop, without writing a single line of XAML (though I do not recommend this, and we will later see why).
Now, let’s talk about a second way of adding a control to our Window. Position the cursor inside the XAML editor, right under the line where the button was created, and type this line:
<Label Content="We have created a new label!" Height="30" Margin="185, 177, 201, 112"/>
like this:

When you are done, you will notice a new control has been added to our interface, this time, a text Label. Do not worry yourselves with the codes involved, for the moment, we will briefly explain them in future lessons.
One final thing that should be mentioned. You should pay attention to the small toolbar that separates the Visual Design from the XAML Editor.

There are a few buttons there that let you modify the zoom level of your GUI designer, swap the visual and editor area, and many other features that will help you by speeding up the designing process.
Tags: graphical user interface, GUI, XAML

